Wednesday, August 21, 2013

Calm the inner Vampire

I have a long standing preference for uber-dark windows on my cars, I hadn't yet had these tinted because 1) the top is off 90% of the time so it seems a little silly and 2) I couldn't decide if they "belonged" on a classic car.

In the end I said the hell with it, I like them that way, it's my car and it will block at least some of the sun from roasting me.  I ultimately had to leave my car with my long-standing (8-10 cars so far) tint guru for 2 days to get the job done.  I did kid him that I assumed he was pulling a Ferris Beuller-esc parking garage attendant and keeping it to joy ride.  It took the poor guy 4 tries to do the back window but he ultimately got it and it turned out fantastic.

I had the windshield done in 35%, sides in 15% and the back in 5%.  Many won't like it, I think it's bad a$$.

On unrelated notes:
I've finished the back seats, installed my munchkin's rear 3-point belt, added in the fire extinguisher and this weekend cleaned and lubed up the steering U-Joints as a previous tightness in steering was getting worse (hoping that was it, I'll find out shortly).  Otherwise I've actually gotten to drive her several days in between some constant rain we have had here for months.  You may expect my blog posts to become more infrequent now that I can be out enjoying the subject of said blog :)
Sunday, August 11, 2013

[insert angels] Aaaaahhhhhhhhh [/shut up angels]

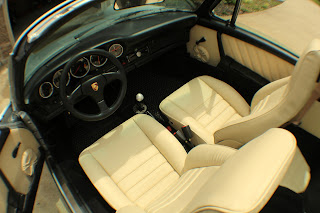
I am officially tired of this project, thankfully it is 97% done and complete enough as of a few hours ago that I shall resume enjoying my road-going plaything and tackle that last 3% as I feel like it (since it's includes items not particularly necessary to show it off to the world).

I finished up the doors over the last 2 days, fiddly pains in the butt is an understatement but boy did it make a difference once there was no more yellow showing.

I gave her a bath after everything just a couple dribbles on the seats which I'll call a victory in a car like this, my top is also still need to be restored but that's going to have to wait for a while until my bank account recovers from the last 2 months of interior work.

I've spent the last 8 weeks, 2-3 nights/wk for 2-3 hours, at least one weekend day and usually a bit of both working on this.  I still have to install my Gate Shifter, finish covering 1 rear seat back and install those with my son's rear seatbelt and wire in the seat heaters.


I even sourced the silly little snaps on a tab that are supposed to hold the trunk carpet in place, it actually looks like it's supposed to in there now :).


And last but not least a little addition to the nose, it's purely for the delight of my 4 year old.  Don't worry, the proper badge is carefully stored for when the passing fancy goes away.


Wednesday, August 7, 2013

Sealed up like a virgin at a revival

I shall reiterate for the dozenth time that I'm no expert, and my car is never going to win any concours shows but little victories like this one really make me smile.

My top still probably (woefully) needs to be rebuilt, however I've added new seals to it's sides and tweaked the new seals on the car and it until I now have it sealed up fairly well.  There are still gaps between the top material and windshield header but I believe that's where Mr. Dan comes in at Cars Inc and my top becomes the 2nd item I farm out so it's done by a pro.

Last night I set about adjusting my windows and vent frames so that they met up with the sides and top better and after an hour of fiddling (with one side) I have what you see here.  Where once one could easily see daylight (let alone the water it let in if left out in the rain) in plenty of spots I now have a nice tight seal around 98% of the window.

I've been sent (2) .pdf documents/service bulletins as issued by Porsche regarding sealing and fitment and if anyone is in need of them feel free to drop me a line and I'll share them.  They were quite helpful in finding the adjustment points.

Sunday, August 4, 2013

I popped a cap in dat a$$

so each and every tank of gas that I've put in this car so far has gone like this:

Pull up to the pump, remember to cut the non-power steered wheel all the way to the left, now feel your way up to the top of the wheel well, push the rubber boot around the fuel neck out of the way and tug down on the spring loaded door release.  This isn't entirely comfortable, nor necessarily clean.  Oh yeah, don't forget you are cranked all the way to the left, better not to hit the extremely flammable pumping device or bang up your pretty car on those cold, heartless bollards.

Yesterday that all changed.  I was able to buy a brand new cable and knob to put where once there was none at all to the left of the steering wheel.  Now problem one was that I couldn't get the damn wire to come out under the claw no matter how I tried.  So I took the cotter pin out of the claw creating problem 2, how to get that infernal little mother &&^%% thing back together.

Well a search produced this which was incredibly helpful and ultimately saved the day.  Although I feel like his diagram regarding the spring direction is backwards, I don't have quite as much spring as there once was....but it's operating so it's staying this way until it isn't.

The final challenge was the cable stay, I didn't have one, never got anyone to respond to a WTB and couldn't seem to track down a part no.  I'm sure it's out there, and if my solution fails I'll make more efforts to find it as this simple, pull a knob and the gas flap magically jumps up is quite intoxicating.

I ultimately turned to my model aircraft supplies, found what is actually a tiny prop saver which fit perfectly.

Wind in my hair.....not in my face

I was able to enlist the help of the resident hottie this morning to [re]install my windshield.  It was actually as incredibly easy to put in as it was to take it out.  Scary, because of the opportunity to turn a nice large piece of glass into a bucket full of trash in very short order, but ultimately easily accomplished.

After reading about it in several places (and waiting for said lovely Mrs.) I placed a nylon cord/rope (~1/8" thick) in the groove, starting in the middle at the bottom and ending at the top middle, overlapped by ~4".  I then went and grabbed the Astroglide.  My reading from more experienced than myself indicated either this or dish soap, my recent experience with soap getting rubber seals in place led me to feel it dried out too quickly, lets say experience with the other product leads me to feel there's a bit more "working time" available :)

So I lubed up the inner-most lip of the seal (which will slip over the body lip) and also the window channel and the body seam on the car.  We lined it up in the hole nice and even at which time I got in the car and started tugging on the cord slow and steady while she pushed in along where I was working.

I got one side down around the corner just at the dash and started back at the top working around to the same spot on the other side.  Then I carefully did along the dash, making sure the rubber wasn't left sitting on the flap of the dash but on the inside of the body seam.

Overall it worked incredibly easily, the seal just folds out replacing what was metal a moment ago with rubber.  I'm going to add a bit of sealant to the corners per recommendations I've read but will try to avoid using silicon if possible.

I remain convinced that there is close to nothing on these old girls that can't be done by a reasonably mechanically inclined home mechanic once you get the nerve up to try it for the first time.

Project status:
I've got to work on my targa top's fitment, new rubber on it as well as it's mating surfaces has it sitting kinda crazy and the window's & vents need to be aligned.  Once that's done I can assemble the door panels and put her back on the road while I tweak plenty of little odds and ends.